月度归档:2014年03月

商品SKU选择实现

在客户购买商品的时候,若这个商品存在多种”规格”(SKU),就需要客户手动选择自己想要的哪款。当时并不是每种我们都有库存, 所有就需要提供提供一个筛选功能,当客户选中一个条件的时候,需要设置其他条件中的一些值不可选。 这样就能保证不论客户怎么选择,到最后的选择都是有库存的”规格”(SKU)

开始之前先定义几种术语

属性集: 一个商品全部属性的集合

属性: 商品中的 尺码 颜色 就是两个属性

属性值: 尺码、颜色可有多个值 比如 衣服的尺码:S M XL 衣服的颜色:黑色 白色 蓝色 其中 XL 黑色就是属性值

SKU: Stock Keeping Uint(库存量单位) 由属性值组合而成(这些属性值属于不通的属性)如 一件衣服 (XL,白色) 它能确定商品的 唯一性 ,同一款式的衣服 可能有不通的颜色和大小 ,把颜色大小限制住,就能确定这件‘商品’了。

为了简化 我们虚拟出一个的商品, 下面是它的属性集和SKU:

var keys = {
    'attr1':['10','11'],
    'attr2':['20','21','22','23'],
    'attr3':['30','31','32'],
    'attr4':['40','41']
};
/*num是库存*/
var sku_list=[
    {'attrs':'10|20|30|40','num':120},
    {'attrs':'10|21|30|40','num':10},
    {'attrs':'10|22|30|40','num':28},
    {'attrs':'10|22|31|41','num':220},
    {'attrs':'10|22|32|40','num':130},
    {'attrs':'11|23|32|41','num':120},
    ];    

为选择之前是这种显示状态

attr1  10    11
attr2  20    21   22   23 
attr3  30    31   32 
attr4  40    41 

attr1-attr4中有 2x4x3x2=42种组合,但是有库存的只有上面6种组合

我们要做的就是,在选择某一个属性的时候,把其他为选择的属性中的一些值设置为block(锁定状态) 因为它们和已选属性的组合是没有库存的(有库存的只有上面6种)

比如:
选择 10 和 21后, 有库存的SKU(组合) 只有

{'attrs':'10|21|30|40','num':10},

attr3中的31 32 以及attr4中的 41 就要设置为block

attr1 *10*   11 
attr2  20   *21*  22   23 
attr3  30   -31- -32-
attr4  40   -41-

总结1:在所有库存组合(sku_list)中筛选出包含选中属性值(10,21)组合(10|21|30|40)未选的属性(attr3、attr4)中的所有属性值若不在这个组合中就设置为block

还有一个问题,在已选属性(attr1,attr2)中 , 我可以把21换成2022; 因为 10|21 10|22 也是一种可行组合(有库存),10|23不可行,所以需要2022也可选,23设置为block

或者21不变,修改attr1中的属性值 11|21 不可行,11设置block。

attr1 *10*  -11-
attr2  20   *21*  22  -23-
attr3  30   -31- -32-
attr4  40   -41-  

总结2: 已选属性 (attr1,attr2) 中任意一个属性(attr1)的属性值(10,11), 若不能和其他属性(attr2)中的选中属性值(21) 组合成有效(有库存)组合, 则设置该属性(11)为block

好了,接下来就是根据上面总结的两条,来进行程序的实现 点击 商品SKU选择DEMO 可查看demo

<!DOCTYPE HTML>
<html lang="en-US">
<head>
	<meta charset="UTF-8">
	<title>商品SKU选择DEMO</title>
</head>
<body>
	<style type="text/css">
ul,li{ padding:0px; margin:0px;}    
#panel{ width:500px; margin:30px auto;}

.goods_attr{ overflow:hidden;}
.goods_attr .label {font: 12px/30px '宋体';color: #777;width: 50px;;padding-right: 10px;float: left; display:block;}
.goods_attr ul {float:left;width:300px;}

.goods_attr li{color:#333;overflow:hidden;position:relative;float:left;text-align:center; vertical-align:middle; border:1px solid #999;text-indent:0; cursor:pointer}
.goods_attr li.b{border:1px dotted #CCC;color:#DDD; pointer:none;}
.goods_attr li.b img {opacity:0.4;}
.goods_attr li.sel{ border:1px solid #c80a28;color:#333;}

.goods_attr li.text{margin:5px 10px 5px 0; height:23px;line-height:23px;text-indent:0;padding:0 23px;font-style:normal;}
.goods_attr li.img{ margin-right:10px;width:35px;height:35px; line-height:35px;text-align:center;}

    </style>

<div id="panel">
    <div id="panel_sku_list"><pre></pre></div>
    <div id="panel_sel">

    </div>

</div>      

<script src="http://libs.baidu.com/jquery/1.9.0/jquery.min.js"></script>    
<script type="text/javascript">
/*
属性集
下面一共有4个属性
属性item1 下面有 2个属性值 分别是 10,11
(举个常见的例子 属性尺码 下有 S M L XL 4个属性值 )
*/
var keys = {
    'attr1':['10','11'],
    'attr2':['20','21','22','23'],
    'attr3':['30','31','32'],
    'attr4':['40','41']
    };
//SKU,Stock Keeping Uint(库存量单位)    
var sku_list=[
        {'attrs':'10|20|30|40','num':120},
        {'attrs':'10|21|30|40','num':10},
        {'attrs':'10|22|30|40','num':28},
        {'attrs':'10|22|31|41','num':220},
        {'attrs':'10|22|32|40','num':130},
        {'attrs':'11|23|32|41','num':120},
        ];    

/**init start */

//显示html结构
function show_attr_item(){        
    var html='';
    for(k in keys){
        html+='<div class="goods_attr" > <span class="label">'+k+'</span>';
            html+='<ul>'
            for(k2 in keys[k]){
                _attr_id=keys[k][k2];
                html+='<li class="text" val="'+_attr_id+'" >';
                html+='<span>'+_attr_id+'</span>';
                html+='<s></s>';
                html+='</li>'
            }
            html+='</ul>';
        html+='</div>';
    }
    $('#panel_sel').html(html);
}
//显示数据
function show_data(sku_list){
    var str="";
    for( k in sku_list){
        str+=sku_list[k]['attrs']+"\t"+sku_list[k]['num']+"\n";
    }
    $('#panel_sku_list pre').html(str);
}

show_data(sku_list);
show_attr_item()

/**init end */

//获取所有包含指定节点的路线
function filterProduct(ids){
    var result=[];
    $(sku_list).each(function(k,v){
        _attr='|'+v['attrs']+'|';
        _all_ids_in=true;
        for( k in ids){
            if(_attr.indexOf('|'+ids[k]+'|')==-1){
                _all_ids_in=false;
                break;
            }
        }
        if(_all_ids_in){
            result.push(v);    
        }

    });
    return result;
}

//获取 经过已选节点 所有线路上的全部节点
// 根据已经选择得属性值,得到余下还能选择的属性值
function filterAttrs(ids){
    var products=filterProduct(ids);
    //console.log(products);
    var result=[];
    $(products).each(function(k,v){
        result=result.concat(v['attrs'].split('|'));

    });
    return result;
}

//已选择的节点数组
function _getSelAttrId(){

     var list=[];
     $('.goods_attr li.sel').each(function(){
        list.push($(this).attr('val'));
     });
     return list;
}

$('.goods_attr li').click(function(){
    if($(this).hasClass('b')){
        return ;//被锁定了
    }
    if($(this).hasClass('sel')){
        $(this).removeClass('sel');
    }else{
        $(this).siblings().removeClass('sel');
        $(this).addClass('sel');

    }
    var select_ids=_getSelAttrId();

    //已经选择了的规格
    var $_sel_goods_attr=$('li.sel').parents('.goods_attr');

    // step 1
    var all_ids=filterAttrs(select_ids);     

    //获取未选择的
    var $other_notsel_attr=$('.goods_attr').not($_sel_goods_attr);

    //设置为选择属性中的不可选节点
    $other_notsel_attr.each(function(){
       set_block($(this),all_ids);

    });

    //step 2
    //设置已选节点的同级节点是否可选
    $_sel_goods_attr.each(function(){ 
        update_2($(this));  
    });

});

function update_2($goods_attr){
    // 若该属性值 $li 是未选中状态的话,设置同级的其他属性是否可选
    var select_ids=_getSelAttrId();
    var $li=$goods_attr.find('li.sel');

    var select_ids2=del_array_val(select_ids,$li.attr('val'));

    var all_ids=filterAttrs(select_ids2);

    set_block($goods_attr,all_ids);
}

function set_block($goods_attr,all_ids){

//根据 $goods_attr下的所有节点是否在可选节点中(all_ids) 来设置可选状态
    $goods_attr.find('li').each(function(k2,li2){

        if($.inArray($(li2).attr('val'),all_ids)==-1){
            $(li2).addClass('b');
        }else{
            $(li2).removeClass('b');
        }

    });

}
function del_array_val(arr,val){
//去除 数组 arr中的 val ,返回一个新数组
    var a=[];
    for(k in arr){
        if(arr[k]!=val){
            a.push(arr[k]);
        }
    }
    return a;
}

</script>

</body>
</html>



会说话的树莓派,将文字转换为语音

树莓派带了个音频输出接口,可外接小音箱。要是能实现文本到语音转换(text2speech)的话。 它的可玩性大大的提高了,比如 起床的时候语音播报天气、朗读电子邮件…更多的发挥你的想象力吧

这里介绍两种方式:1.通过本地程序转换 2使用在线api接口,这个需要联网

本地通过软件转换

我使用的是festival 一个免费的文字转语音软件,不需要联网。

在树莓派上可直接安装

$ apt-get install festival
$ festival -v
festival: Festival Speech Synthesis System: 2.1:release November 2010

安装好后 测试下

直接输入festival可进入交互方式

$ festival
festival> (SayText "hello boy")

或者直接通过命令行

$ echo 'hello boy' |festival --tts

festival 默认带的声音kal_diphone效果并不好(呃,有点模糊,电音效果?)

官方也有其他的声音,效果也不错online demo 遗憾的是这些没有开放下载

在官方FAQ http://www.cstr.ed.ac.uk/projects/festival/demofaq.html#voices

Q:I really like your demo, where can I download voice XYZ?

A: ….

The good news, though, is that we’re currently putting together a portfolio of dozens and dozens (really!) of voices which will be available to download shortly. Some voices will be available for commercial use only, some for non-commercial use only, and indeed some for both.

不知道shortly是什么时候

但是我们可以选择安装一些第三方的语音库,下面介绍两个

mbroal

官方mbroal安装说明

我按照说明做了一下,路径稍微有点不同,上面说要解压 festvox_us1到 /usr/share/festival/lib/voices, 而实际目录是/usr/share/festival/voices/ 不然会报错,可能跟festival的版本有关系

1.Install the festival voice wrapper. 安装 festvox_us1

root@coolpi:/tmp# 
$ wget http://www.cstr.ed.ac.uk/downloads/festival/1.95/festvox_us1.tar.gz
$ tar -xzvf festvox_us1.tar.gz
festival/lib/voices/english/us1_mbrola/festvox/us1_mbrola.scm
festival/lib/voices/english/us1_mbrola/festvox/usdurtreeZ.scm
festival/lib/voices/english/us1_mbrola/usradio
$ cp festival/lib/voices/english/us1_mbrola /usr/share/festival/voices/english/ -R 

2.Get the MBROLA voice and binary. 到 http://tcts.fpms.ac.be/synthesis/mbrola.html

下载 MBROLA binary 和 MBROLA Voices

分别选择

Raspberri_pi 注意binary要选择适用于树莓派的版本

us2: American English Male (6.3Mb) Babel Technology 也可以选择其它声音

压缩包中的文件 $ wget http://tcts.fpms.ac.be/synthesis/mbrola/bin/raspberri_pi/mbrola.tgz #里面只有一个二进制文件mbrola,把它解压到 /usr/local/bin下 $ tar -xzvf mbrola.tgz -C /usr/local/bin/

#
$ wget http://tcts.fpms.ac.be/synthesis/mbrola/dba/us1/us1-980512.zip
$ unzip us1_mbrola.zip -d /usr/share/festival/voices/english/us1_mbrola/

最后目录结构看起来是这样的

/usr/share/festival/voices/english/us1_mbrola/
├── festvox
│   ├── us1_mbrola.scm
│   └── usdurtreeZ.scm
├── us1
│   ├── license.txt
│   ├── TEST
│   │   ├── alice.pho
│   │   ├── mbrola.pho
│   │   ├── mbroli.ini
│   │   ├── push.pho
│   │   └── xmas.pho
│   ├── us1
│   ├── us1mrpa
│   └── us1.txt
└── usradio

查看 已安装的语音

festival> (voice.list)
(us1_mbrola kal_diphone)

选择声音,测试下

festival> (voice_us1_mbrola)
us1_mbrola
festival> (SayText "hello boy")

嗯 比自带的那个声音好点…

cmu(更接近真人声音的)

1.安装 festlex-cmu

$ apt-get install festlex-cmu

2.下载 cmu

cd /usr/share/festival/voices/english/
#这个压缩包100多M
sudo wget -c http://www.speech.cs.cmu.edu/cmu_arctic/packed/cmu_us_clb_arctic-0.95-release.tar.bz2
sudo tar jxf cmu_us_clb_arctic-0.95-release.tar.bz2 
sudo ln -s cmu_us_clb_arctic cmu_us_clb_arctic_clunits

选择声音,测试下

festival> (voice_cmu_us_clb_arctic_clunits)
cmu_us_clb_arctic_clunits
festival> (SayText "hello boy")   

声音又上了一个档次,但是解析的时候能明显感觉出来有延迟。估计放到配置高点的电脑上会好些。

可以在配置文件中设置默认的声音

sudo cp /etc/festival.scm /etc/festival.scm.backup
sudo echo "(set! voice_default 'voice_cmu_us_clb_arctic_clunits)" >> /etc/festival.scm      

在线tts api接口

找到两个

1.tts-api这个接口是免费的,效果还行,起码比festival好

http://tts-api.com/tts.mp3?q=hello+world.

2.google翻译的接口

这个接口并不是官方正式提供的,不过从速度,声音效果来说是最好的(非常好!),网速好的话基本上感觉不出来延迟

点这里测试下

http://translate.google.com/translate_tts?ie=UTF-8&tl=en&q=hello+world

三个参数 q=要转换的文字; tl=文字的语言 中文选择zh-cn; ie 要转换的文字q的编码方式;

上面接口返回音频格式是mp3的,可使用mpg123 直接播放

$ apt-get install mpg123
$ mpg123 'http://translate.google.com/translate_tts?ie=UTF-8&tl=en&q=today+is+sunday'

上面两种方式可以结合着使用,比如在为联网的时候使用festival,联网使用效果更好的在线接口

参考

给树莓派添加重启关机按钮

最近一段时间开始捣鼓树莓派了,弄的都是试验性质的。经常会出现些问题 导致连不上树莓派可能是卡死或者断网什么的,有没有显示器也不知道到底是什么情况。 没办法只有拔掉电源重启了。

后来想想长期这样弄也不是办法SD卡禁不起折腾啊,于是就想办法给它添加了个“关机和重启按钮”。

这里实现上用了GPIO接口,通过读取一个接口的高低状态然后调用 重启以及关机命令。

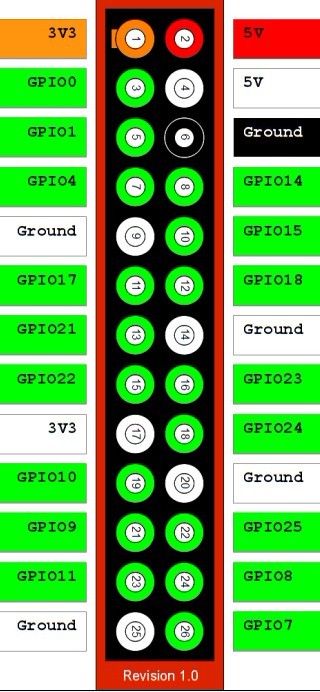
我的pi是B版v1。GPIO接口和v2稍微不一样。具体看下图 把代码的接口定义替换成对应的就行了

rasberrypi GPIO

下面这个两幅图更容易看

树莓派v1 GPIO接口定义 树莓派v2 GPIO接口定义

另外使用pin的编号有两种方式

  1. Board Pin 这种是自然排序的,重p1到p26
  2. BCM GPIO Broadcom的编号方法 (上图中的绿色方块部分GPIO*)

我在代码中使用的是 *BCM *。

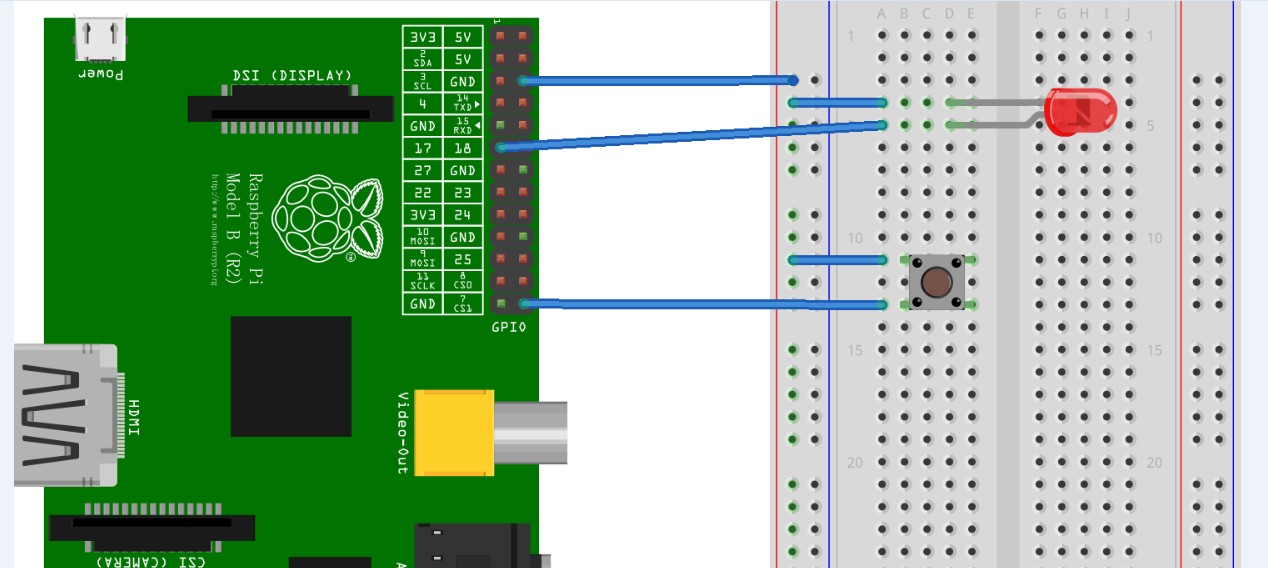
这里用到了两个GPIO接口,7和17 你也可以自己修改下。 一个用来接收按键信号,另外一个驱动led显示状态

led有三个状态 长亮:正在重启, 闪动:正在关机, 不亮:等待状态。

面包板连接 树莓派重启面包板连接图
若你有杜邦线的话也可以不通过面包板连接,按钮那个GND的线也不是必须的,用手直接触摸 GPIO7 也能起到把这个电压拉低的效果

实现代码

#!/usr/bin/env python
# coding=utf-8
# author:ksc

import RPi.GPIO as GPIO
import time
import os,sys
import signal

GPIO.setmode(GPIO.BCM)

#define GPIO pin
pin_btn=7
pin_led=17

GPIO.setup(pin_btn, GPIO.IN, pull_up_down=GPIO.PUD_UP)
GPIO.setup(pin_led, GPIO.OUT, initial=GPIO.LOW)

press_time=0
count_down=10
led_on=1

def cleanup():
    '''释放资源,不然下次运行是可能会收到警告
    '''
    print('clean up')
    GPIO.cleanup()

def handleSIGTERM(signum, frame):
    #cleanup()
    sys.exit()#raise an exception of type SystemExit

def onPress(channel):
    global press_time,count_down
    print('pressed')
    press_time+=1
    if press_time >3:
        press_time=1
    if press_time==1:
        GPIO.output(pin_led, 1)
        print('system will restart in %s'%(count_down))
    elif press_time==2:
        print('system will halt in %s'%(count_down))
    elif press_time==3:
        GPIO.output(pin_led, 0)
        print 'cancel '
        count_down=10

GPIO.add_event_detect(pin_btn, GPIO.FALLING, callback= onPress,bouncetime=500)

#signal.signal(signal.SIGTERM, handleSIGTERM)
try:
    while True:
        if press_time==1:
            if count_down==0:
                print "start restart"
                os.system("shutdown -r -t 5 now")
                sys.exit()
            led_on=not led_on
            GPIO.output(pin_led, led_on)# blink led
        if press_time==2 and count_down==0:
            print "start shutdown"
            os.system("shutdown  -t 5 now")
            sys.exit()

        if press_time==1 or press_time==2:
            count_down-=1
            print "%s second"%(count_down)
        time.sleep(1)
except KeyboardInterrupt:
    print('User press Ctrl+c ,exit;')
finally:
    cleanup()

使用方法

#创建程序,把代码粘贴进去保存
root@mypi:~# vi reboot.py
#修改可执行
root@mypi:~# chomod 775 reboot.py
#测试下
root@mypi:~# ./reboot.py

按一下按钮 系统进入重启状态倒计时10秒,在这段时间内你可以接着按一下切换到关机状态。 按第三下取消关机进入等待状态。这三种状态可通过按按钮不断切换。

#若没问题就可以让它后台运行了,
root@mypi:~# nohup ./reboot.py &
#想结束后台运行?
ps auxf #查找PID
kill PID

参考

上拉电阻和下拉电阻

使用 RPI.GPIO 模块的输入(INPUT)功能

RPI.GPIO WIKI

使用python向服务器POST大文件

使用python向服务器POST大文件

python 对http操作有几个库 urllib 、 urllib2 还有httplib

httplib比较偏底层 一般情况下使用urllib和urllib2就行了

NOTICE

在python3中urllib与urllib2被分割合并为了 urllib.request, urllib.parse, and urllib.error

httplib重命名为 http.client

分析http协议

python的这几个库中并没有提供直接上传文件的接口 我们先看下普通浏览器是怎么上传文件的 这里我在本地创建简单php程序 若有提交文件,则打印出文件相关的信息。否则显示一个上传表单表单

<?php
header('Content-Type: text/html; charset=utf-8');
if(!empty($_FILES)){
    var_dump($_FILES);
    exit;
}

?>

<!DOCTYPE HTML>
<html lang="en-US">
<head>
    <meta charset="UTF-8">
    <title></title>
</head>
<body style="text-align:center;">
    <form action="" method="POST" enctype="multipart/form-data" >
        <input type="text" name="username" value="ksc"/> <br/>
        <input type="file" name="file" />
        <input type="submit" value="submit"/>
    </form>
</body>
</html>

这里推荐一个抓包工具fildder 可以很方便的抓取htttp数据,并且直观的显示

下面就是抓取到的内容

POST http://localhost/test/postfile.php HTTP/1.1
Host: localhost
Connection: keep-alive
Content-Length: 295
Cache-Control: max-age=0
Accept: text/html,application/xhtml+xml,application/xml;q=0.9,image/webp,*/*;q=0.8
Origin: http://localhost
User-Agent: Mozilla/5.0 (Windows NT 6.1; WOW64) AppleWebKit/537.36 (KHTML, like Gecko) Chrome/32.0.1700.107 Safari/537.36
Content-Type: multipart/form-data; boundary=----WebKitFormBoundarynHbCm1TeYE1AHFXv
DNT: 1
Referer: http://localhost/test/postfile.php
Accept-Encoding: gzip,deflate,sdch
Accept-Language: zh-CN,zh;q=0.8,en;q=0.6

------WebKitFormBoundarynHbCm1TeYE1AHFXv
Content-Disposition: form-data; name="username"

ksc
------WebKitFormBoundarynHbCm1TeYE1AHFXv
Content-Disposition: form-data; name="file"; filename="b.txt"
Content-Type: text/plain

我是文件内容
------WebKitFormBoundarynHbCm1TeYE1AHFXv--

从第1-13行就是请求消息http头部的内容,然后下面有个空行 比较重要的几行是

POST http://localhost/test/postfile.php HTTP/1.1
Host: localhost
Content-Length: 295
Content-Type: multipart/form-data; boundary=----WebKitFormBoundarynHbCm1TeYE1AHFXv

内容数据

请求消息(Request message)有以下几部分组成

  • 请求行(request line), 例如 GET /images/logo.png HTTP/1.1
  • 请求头(Request Headers) 比如上面的 Host: localhost、 Content-Length: 295
  • 空行
  • 消息主体 message body

NOTICE

请求行与请求头必须以结尾,空行只能有不能有空格什么的 在HTTP/1.1协议中,除了Host 所有的请求头都是可选的(当然若上传文件的话,就必须设置了Content-Length和Content-Type了, 不然服务器收不到数据的,虽然也能成功响应)

这里message body的类型是multipart/form-data;

boundary 是随机的内容每次请求都不一样, Content-Type为 multipart/form-data; 可同时传输多项数据,而这些数据就是通过 boundary分割开来的

每一项的数据都是’–‘+boundary+换行开始 ,然后是Content-Disposition: form-data;name=”表单项名”

若是文件的话 还有个filename 以及Content-Type,接下来一个空行

最后’–‘+boundary+’–‘+换行结束

到这里整个http请求就结束了

模拟提交数据

其实http协议就是字符串按照约定规则拼接到一起 然后服务器再来解析得到数据 所以我们自己直接使用socket也能发起了一个http请求

但是有了urllib2我们可以省很多事 只需“拼接”内容部分就行了

urllib2.urlopen(url[, data][, timeout])

url 可以是一个链接或者Request对象 data 就是我们要“拼接的内容”

# coding=utf-8

import urllib2
import mimetypes
import os
import uuid

mimetypes.init()

url='http://localhost/test/postfile.php'
fileFieldName='myfile'
file_path='/a.txt'

boundary='--------ksc'+uuid.uuid4().hex;
print('boundary:'+boundary)
req = urllib2.Request(url)
req.add_header("User-Agent", 'ksc')
req.add_header("Content-Type", "multipart/form-data, boundary="+boundary)
def getdata(boundary,file_path):
    global fileFieldName
    file_name=os.path.basename(file_path)
    file_name=file_name.encode('utf-8')
    file_type= mimetypes.guess_type(file_name)[0] #根据文件名匹配文件的mime类型若没有匹配到会返回None
    if file_type==None:
        file_type = "text/plain; charset=utf-8"

    print file_type
    print file_name
    fileData=open(file_path,'rb').read()
    CRLF='\r\n'
    body = '';     
    body += '--' + boundary + CRLF;
    body += 'Content-Disposition: form-data; name="'+fileFieldName+'"; filename="' + file_name + '"'+CRLF;     
    body += "Content-Type: "+file_type+CRLF
    body += CRLF;     
    body += fileData + CRLF;     
    body += "--" + boundary + "--"+CRLF;  
    print 'body size:{0}'.format(len(body))
    return body

#req.add_header('Content-Length',len(body) ) #urllib2会自动添加
res = urllib2.urlopen(req,getdata(boundary,file_path))
print res.read().decode('utf-8');

下面是运行后的输出结果

boundary:--------ksc114eaa38291f43fdaca15ab3b4265a82
text/plain
a.txt
body size:388
array(1) {
  ["myfile"]=>
  array(5) {
    ["name"]=>
    string(5) "a.txt"
    ["type"]=>
    string(10) "text/plain"
    ["tmp_name"]=>
    string(24) "D:\xampp\tmp\php151B.tmp"
    ["error"]=>
    int(0)
    ["size"]=>
    int(197)
  }
}

php能正常接收传输的文件了 但是这里有个问题 ,我们拼接数据的时候使用的是

fileData=open(file_path,'rb').read()

直接把文件内容读到内存中去了,小文件还好,要是几百M上G的文件还用这种方法就不行了,这样会把你的内存吃干。

所以我们就需要弄个变通的方法,让它一块一块的发送数据,读一点发送一点。 这几个库并没有提供类似的方法实现这一个功能,所以就需要自己动手了。

首先介绍一个python的关键字 yield 关于介绍python yield的文章可以查看Python yield 使用浅析 可以通过它来实现一个生成器(generator) 来不断的读取文件数据,而且是只在我们需要的时候读取

def read_file(fpath): 
    BLOCK_SIZE = 1024 
    with open(fpath, 'rb') as f: 
        while True: 
            block = f.read(BLOCK_SIZE) 
            if block: 
                yield block 
            else: 
                return

然后我重写了 httplib 中 HTTPConnection.send(data)使它可以接收一个generator,从里面取数据然后发送 下面是原版HTTPConnection.send的源码

def send(self, data):
    """Send data to the server."""
    if self.sock is None:
        if self.auto_open:
            self.connect()
        else:
            raise NotConnected()

    if self.debuglevel > 0:
        print "send:", repr(data)
    blocksize = 8192
    if hasattr(data,'read') and not isinstance(data, array):
        if self.debuglevel > 0: print "sendIng a read()able"
        datablock = data.read(blocksize)
        while datablock:
            self.sock.sendall(datablock)
            datablock = data.read(blocksize)
    else:
        self.sock.sendall(data)

它支持文件类型File Object 或者是一个字符串

下面是个重新版本

def send(self, data):
    """Send data to the server."""
    if self.sock is None:
        if self.auto_open:
            self.connect()
        else:
            raise NotConnected()

    if self.debuglevel > 0:
        print "send:", repr(data)
    blocksize = 8192
    if hasattr(data,'next'):#支持迭代
        for datablock in data:
            self.sock.sendall(datablock)
    elif hasattr(data,'read') and not isinstance(data, array):
        if self.debuglevel > 0: print "sendIng a read()able"
        datablock = data.read(blocksize)
        while datablock:
            self.sock.sendall(datablock)
            datablock = data.read(blocksize)
    else:
        self.sock.sendall(data)

当然若想实现完美的文件提交,还需要做个封装,下面是一个简单的实现,还有写不完善的地方,post数据只能传文件,打算做个python lib封装一下

# coding=utf-8

import httplib
import mimetypes
import os
import uuid
import socket

mimetypes.init()

url='http://localhost/test/postfile.php'
fileFieldName='myfile'
file_path='/temp/a.txt'

content_length=0   
class builder:

    def __init__(self):

        self.boundary='--------ksc'+uuid.uuid4().hex;
        self.boundary='--------kscKKJFkfo93jmjfd0ismf'
        self.ItemHeaders=[];
        self.CRLF='\n'

    def getBoundary(self):
        return self.boundary

    def getHeaders(self):    
        '''return Request Headers'''
        headers={"Content-Type":"multipart/form-data, boundary="+self.boundary
                ,"Content-Length":self.getContentLength()
                }
        return headers        
    def putItemHeader(self,fieldName,file_path):

        file_name=os.path.basename(file_path)
        print file_name
        file_name=file_name.encode('utf-8')
        file_type= mimetypes.guess_type(file_name)[0] #guess file's mimetype
        if file_type==None:
            file_type = "text/plain; charset=utf-8"

        print file_type

        CRLF=self.CRLF
        head = '';     
        head += '--' + self.boundary + CRLF;
        head += 'Content-Disposition: form-data; name="'+fieldName+'"; filename="' + file_name + '"'+CRLF;     
        head += "Content-Type: "+file_type+CRLF
        head += CRLF;
        self.ItemHeaders.append({'head':head,'file_path':file_path})

    def getContentLength(self):    
        length=0
        for item in self.ItemHeaders:
            length+=len(item['head'])+os.path.getsize(item['file_path'])+len(self.CRLF)

        return length+len("--" + self.boundary + "--"+self.CRLF)

    def getdata(self):

        blocksize=4096
        for item in self.ItemHeaders:
            yield item['head']

            fileobj=open(item['file_path'],'rb')
            while True:
                block = fileobj.read(blocksize)
                if block:
                    yield block
                else:
                    yield self.CRLF
                    break

        body = "--" +self.boundary + "--"+self.CRLF;  

        yield body

class MyHTTPConnection(httplib.HTTPConnection):
    def send(self, value):
        if self.sock is None:
            if self.auto_open:
                self.connect()
                print '-----------------ksc: reconnect'
            else:
                raise NotConnected()

        try:
            if hasattr(value,'next'):
                print "--sendIng an iterable"
                for data2 in value:
                    self.sock.sendall(data2)    
            else:
                print '\n--send normal str'
                self.sock.sendall(value) 
        except socket.error, v: 
            if v[0] == 32:      # Broken pipe
                print(v)
                self.close()
            raise
        print '--send end' 

bl=builder()    

bl.putItemHeader(fileFieldName, file_path) 
bl.putItemHeader('bb', u'/temp/贪吃蛇.zip') 
#bl.putItemHeader('zipfile', u'/temp/a.zip') 

#注意web端post数据大小限制  
#这里 php.ini post_max_size = 30M

content_length=bl.getContentLength()
print "content_length:"+str(content_length)

url='/test/postfile.php'
#这里使用fiddler捕捉数据包,设置了fiddler为代理
fiddler_monitor=True
fiddler_monitor=False

if fiddler_monitor:
    httpconnect=MyHTTPConnection('127.0.0.1',8888)
    url='http://localhost'+url
else:
    httpconnect=MyHTTPConnection('localhost')

httpconnect.set_debuglevel(1)

headers = bl.getHeaders()
data    = bl.getdata()

httpconnect.request('POST', url, data ,headers)

httpres=httpconnect.getresponse()
print httpres.read().decode('utf-8')

现在有很多现成的第三方库比如 poster Requests 可以实现这些功能了,但是由于是第三方库需要用户手动安装,在一个我需要上传大文件时有个回调功能,这样就能显示进度了。 等运行稳定了会添加到kuaipan cli 里面,就可以摆脱poster依赖

参考资料

HTTP